The opportunity to take a class from a skilled artisan is reason enough to rejoice. But when the class is on knitting button bands, my heart goes all a twitter. I just might "get it" this time. Don't misunderstand. I've knit button holes, added button bands and even advised a few along the way.
Unfortunately it has always been a struggle. As in get out the reference book and put it along side of the pattern. Tune into a clear video online and take it one stitch at a time. Then rip back three stitches and try again. Eventually I reach the "acceptable" look.
This time I am determined to figure out those button bands and have it click in my little head. I've taken class from Joyce Wyatt before and I enjoy her skill set and her attitude. First, Joyce speaks both crochet and knit. So we speak the same languages. She is an artisan after my own heart because she believes that there are occasions - more often than we might want to admit - when it is necessary to fudge and smudge rather that rip and redo. Gotta love that!
Here is my homework for the lesson. A simple swatch and contrasting yarns ready to knit button bands. The swatch has ribbing and stockinette. I fear that we will be expected to pick up along that ribbing and knit in a button hole that does not pull, squish, look wonky or need a very expensive button to draw attention away from the messy stitching. If anyone can calm my nerves, it is Joyce.
Can't wait for Saturday. Just one more benefit to be gained from belonging to a TKGA guild!
Showing posts with label TKGA. Show all posts
Tuesday, November 13, 2012
Thursday, June 9, 2011
Exchange To Learn
What do you get when knitters love getting together? The opportunity to learn! That's what you get.
In the southern California area, there is no such thing as an isolated knitting Guild. It seems that there are always several folks who belong to more than one TKGA group and what with with coming and going and different meeting days, there is cross over of ideas, inspiration and intelligence amongst many local guilds.
Such was my experience earlier this week when four members of Riverside Knitting Guild were the program at North Coast Knitters (we four are also members there) and explained the Riverside Two-Ball Challenge.
Slide presentation, explanation of the rules, and six years of re-collected challenge items were displayed. When every one does a little part, it sure is easy to present a forty minute learning opportunity that excites knitters.
After our fantastic - if I do say so myself - show and share, there was much interest in comparing challenge items from the same year. Thanks to Pat (she of the PowerPoint presentation), Sue (our RKG President and presentation outline writer), Diane (who is the best ever at showing off what someone else hath knit) and the RKG members who allowed items to be displayed it was a really wonderful show.
Specific entries in the RKG annual Two Ball Challenge drew much attention for the detail and execution shown. All in all, the members of North Coast Knitters were a welcoming, joyous group and the cross-over sharing of Guild activities was well received.
Monday, May 9, 2011
Vest of Many Colors
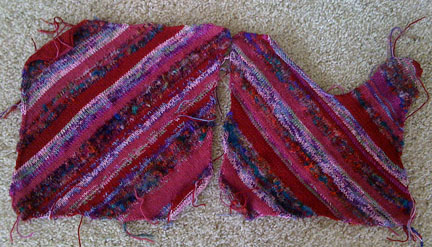
The adage about yarn collectors must be true. I refer to the observation that we tend to collect within the same color palette because of some unseen or unacknowledged basic comfort level. For many a decade, I have acknowledged that my personal preferences are teal, jade and Merlot. A quick look at my stash or my closet will confirm that any variance from these favorites are black, white or red. Although, there is the occasional navy tossed in most often because it is a logo shirt.
If you are a member of The Knitting Guild Association, wander through the oldie but goodie patterns to discover the instructions for this Diagonal V Neck Shell by Laura Bryant of Prism yarns.
As you can see, I had much stash yarn that fell into the merlot color way. And, just to make it interesting, there is a bit of sari silk that leans toward the teal/jade shades.
If you have never experienced a large swath worked on the diagonal, try out this method. There are all manner of videos available to learn the simple increase to desired width, then decrease back down.
I had great fun changing colors throughout the project. Some yarns were held single, others doubled upon themselves or doubled up with another yarn to create a whole new adventure.
Here is the back. One thing that must be understood about knitting on the diagonal is the inherent flexibility of the resulting fabric. And, sometimes that flexibility of a good thing and sometimes it needs to be controlled.
Control in this case comes from a round of single crochet followed by a round of crab stitch (reverse sc) that finishes off all openings. I am particularly grateful for the pattern note impacting the arm openings. The direction to work the crab stitch a little tighter around the arms helps to control the flare that might other wise take place. It is little hints such as this that, when followed, help to add a professional finish to hand work. And that is just one more reason to actually read every word of a pattern. You never know what tidbit will become a part of your knitting bag 'o tricks.
Wednesday, April 20, 2011
Striped Fabric
Call it a magic ball or random usage or well planned usage of yarn. However you refer to it, I enjoyed making this striped fabric.
As a member of TKGA, I often check out the website. During one of my searches into the good information, I discovered an oldie but goodie pattern for a Diagonal V Neck Shell designed by Laura Bryant and Prism Yarns.
I am very pleased to state that no new yarns were purchased for this fabric. Everything came from my stash! There is a bit of wool, cotton, various incarnations of silk and some chemical wonder string.
The pattern is very simple. Diagonal work that makes the back and the front. The only difference between back and front is the V-Neck.
To be honest, the only difficult thing about making this pattern is that there can be a whole lot of ends that must be woven in! Isn't it fortunate that over 50% of the time, I remembered to weave in as the knitting took place.
Because the yarns that I used are not all exactly the same weight, there is some variance in tension. So, it made sense to wet block both pieces prior to sewing and adding the edging to all openings.
Wednesday, September 22, 2010
Don't Say "I Can't"
We hear it often. Or we say it often. "I can't teach." It is akin to uttering all manner of defeatist thinking whilst knitting, crocheting, spinning, weaving, tatting, or the like. Spewing out the can't word repeatedly is like living in the land of Devil's Advocate. Let's move on over to the land of asset based thinking and focus on the word CAN.
I can teach others about knitting. And so can all my yarn loving friends. One thing I love about participating in a TKGA local guild is being encouraged to participate as both student and as teacher. This week it was my turn to teach in a year long activity of my local guild. (I would put in a link to the Riverside Knitting Guild, but our website is offline undergoing a total overhaul, so right now is not a good time to click over. )
Each month, a member is teaching a new stitch. Perhaps I've told you all about this in a prior post. And it was finally my opportunity. I chose to teach Supple Rib. All manner of descriptions exist so Google away.
Or just follow along with the way that I taught the stitching.
Working with a multiple of 3 stitches:
R1 - K1, K the next stitch but leave it on the needle, p2tog
R 2 - Purl across
To be fair, I have seen this worked without the plain K1 so that it becomes simply the knit 1 and leave on needle, p2tog. Knitters choice and please do what pleases you and the look your want to achieve.
What I find odd, is that the simple step of knitting a stitch, but leaving it on the needle to work the p2tog causes confusion. If you have ever knit one front and back (k1fb) then you know the drill. Knit and get that loop over to the right needle, then do something with the loop still on the left needle before dropping it off. Supple Rib is the same concept - you already know how it works. Instead of knitting into the back of the loop still on the left needle, move the yarn into the purl position and insert the right needle into two stitches (the one you did not slip off and the next stitch) and purl them together.
That's it! That is all that is required to learn the Supple Rib. And I just taught you. Wow. I CAN teach. And I have every confidence that you can teach this to someone else. Get out there and teach and learn.
Subscribe to:
Posts (Atom)